Connect USB Drive to Phone: iPhone & Android Guide
Want to transfer files, backup photos, or watch movies on the go without using cloud storage? Connecting a USB flash drive to your iPhone or Android phone is easier than you might think! This guide will walk you through everything you need and the simple steps to get connected, ensuring seamless data management wherever you are. Read on to learn the essentials to connect USB flash drive to phone.
What You’ll Need to connect USB flash drive to phone: The Essential Gear
The specific items you need depend on your phone’s type and port:
For iPhones (with Lightning Port – iPhone 5 to iPhone 14 series):
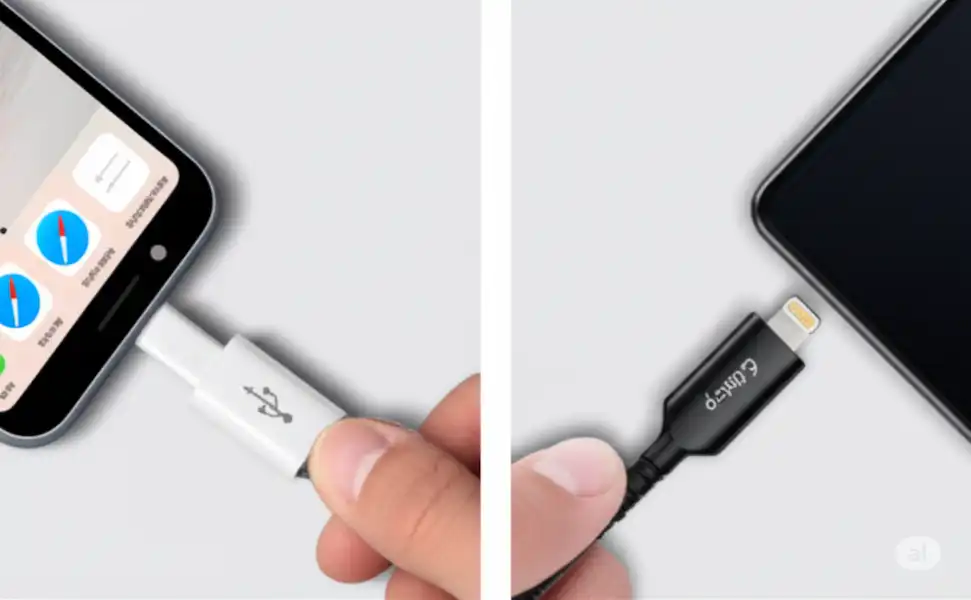
- Lightning to USB Adapter: This is the crucial piece that bridges the gap between your iPhone’s Lightning port and the standard USB-A port of a flash drive. You have two main options readily available:
- Lightning to USB Camera Adapter: A basic adapter that allows data transfer.
- Lightning to USB 3 Camera Adapter: Offers faster transfer speeds (USB 3.0) and often includes a Lightning port for charging your iPhone while the drive is connected. Recommended for larger file transfers common when traveling.
- Compatible USB Flash Drive: Most standard USB-A flash drives will work, but ensure it’s formatted correctly (more on that below). You can find a wide variety in tech stores.
For iPhones (with USB-C Port – iPhone 15 series and newer):
- USB-C to USB-A Adapter: This adapter connects your iPhone 15’s USB-C port to a standard USB-A flash drive. Easily sourced in electronics shops.
- USB-C Hub: Offers multiple ports, including USB-A, allowing you to connect the flash drive and potentially other peripherals simultaneously, useful for digital nomads.
- USB-C Flash Drive: Some flash drives come with a USB-C connector directly, eliminating the need for an adapter. Look for these in larger tech retailers.
- Compatible USB Flash Drive: As above, ensure proper formatting for smooth use.
For Android Phones (with USB-C Port – Most modern Androids):
- USB-C to USB-A Adapter (OTG Cable/Adapter): Most Android phones with USB-C support USB OTG (On-The-Go), which enables them to communicate with USB devices like flash drives. You’ll likely need a USB-C to USB-A adapter, widely available. Many are small and inexpensive, perfect for travel.
- USB-C Flash Drive: Similar to iPhones, you can find flash drives with a direct USB-C connector for Android phones in markets and online.
- Compatible USB Flash Drive: Android generally has broader file system support than iOS, but FAT32, exFAT, and sometimes NTFS are commonly supported. This offers flexibility when using drives purchased locally or internationally.
For Android Phones (with Micro-USB Port – Some older Androids):
- Micro-USB to USB-A Adapter (OTG Cable/Adapter): Similar to USB-C, you’ll need a Micro-USB OTG adapter to connect a standard USB-A flash drive. These can still be found in smaller electronics stores.
- Compatible USB Flash Drive: Check your phone’s specifications for supported file systems. FAT32 and sometimes exFAT are common for older devices used.
Step-by-Step Guide: Connect USB flash drive to phone
For iPhones:
- Connect the Adapter: Plug the Lightning to USB or USB-C to USB-A adapter into your iPhone’s charging port, a common practice for data transfer.
- Plug in the Flash Drive: Insert your USB flash drive into the USB-A port of the adapter.
- Open the Files App: On your iPhone, locate and open the pre-installed “Files” app, your central hub for file management in iOS, even with external drives.
- Access the Flash Drive: In the Files app, under the “Browse” tab, you should see your USB drive listed under “Locations.” It might be labeled with the drive’s name or as “Untitled,” similar to how external storage appears on computers.
- Manage Your Files: Tap on the drive to view its contents. You can now copy, move, and manage files between your iPhone’s storage and the USB drive, essential for sharing photos and documents while traveling.
- Safely Eject (Important!): Before physically disconnecting the adapter, go back to the “Browse” tab in the Files app, tap the “…” (three dots) next to the drive’s name, and select “Eject.” This helps prevent data corruption, a crucial step anywhere, including the humid climate. Then, you can safely unplug the adapter and the flash drive.
For Android Phones:
- Connect the Adapter (if needed): Plug the USB-C or Micro-USB OTG adapter into your Android phone’s charging port. If using a USB-C flash drive, skip this step. These adapters are widely used.
- Plug in the Flash Drive: Insert your USB flash drive into the USB-A port of the adapter or directly into your phone’s USB-C port.
- Notification Alert: You should receive a notification indicating that a USB drive has been connected, a standard Android feature. Tap on this notification.
- Access Your Files: This notification will usually open a file manager app (like Files by Google or your phone’s built-in file manager) where you can see the contents of the USB drive. Alternatively, open your file manager app and look for the USB drive listed under “External Storage,” “USB Drive,” or a similar name, common terms in Android file management.
- Manage Your Files: You can now browse, copy, move, and delete files between your phone’s internal storage and the USB drive, useful for accessing travel documents or transferring photos.
- Safely Eject (Recommended): While not always strictly necessary, it’s good practice to safely eject the USB drive to prevent potential data corruption, especially important when dealing with precious travel photos. Look for an “Eject” option in the notification shade or within your file manager app’s settings for the USB drive. Once ejected, you can safely unplug the adapter and flash drive.
Choosing the Right USB Flash Drive for Your Needs
When selecting a drive to connect USB flash drive to phone, consider these factors:
- Storage Capacity: Choose a size that meets your needs. If you’re primarily backing up photos and videos from your trip, consider larger capacities (64GB, 128GB, 256GB or more).
- Transfer Speeds: Look for USB 3.0 or higher for faster data transfer, especially if you’re dealing with large files like videos of Angkor Wat.
- Connector Type:
- USB-A: The standard connector, requiring an adapter for most modern phones.
- USB-C: Ideal for newer iPhones and Androids with USB-C ports, often offering faster speeds and eliminating the need for an adapter.
- Dual Connector (USB-A & USB-C or USB-A & Lightning): These offer maximum versatility, allowing you to use the drive with both your phone and a computer without needing extra adapters. Particularly useful for travelers with multiple devices.
- Brand Reliability: Stick to reputable brands known for their quality and durability, especially important when considering the potential for dust and humidity.
Comparison Chart of Compatible USB Flash Drives
These USB Flash Drives will work well when you connect USB flash drive to phone:
| Brand | Model | Storage Capacity | Connector Type(s) | USB Version | Read Speed (approx.) | Write Speed (approx.) | Special Features | Availability |
|---|---|---|---|---|---|---|---|---|
| SanDisk | Ultra Dual Drive Luxe | 32GB – 1TB | USB-C & USB-A | USB 3.1 Gen 1 | Up to 150 MB/s | Varies | All-metal design, swivel cap | Common |
| Samsung | Type-C USB Flash Drive | 32GB – 256GB | USB-C | USB 3.1 | Up to 400 MB/s | Up to 40 MB/s | Sleek design, water & shock resistant | Less common |
| Kingston | DataTraveler microDuo 3C | 32GB – 128GB | USB-C & USB-A | USB 3.2 Gen 1 | Up to 100 MB/s | Up to 15 MB/s | Small form factor | Common |
| SanDisk | iXpand Flash Drive Go (for iPhone) | 64GB – 256GB | Lightning & USB-A | USB 3.0 | Up to 90 MB/s | Up to 40 MB/s | Designed for iPhone backup & file management app | Less common |
| Silicon Power | Mobile C50 | 32GB – 256GB | USB-C & USB-A | USB 3.2 Gen 1 | Up to 200 MB/s | Up to 80 MB/s | Retractable design | Available in some costores |
Troubleshooting Common Issues to Connect USB Flash Drive to Phone
Even with the right gear, you might encounter a hiccup or two. Don’t worry, many common problems have simple solutions. Here’s a guide to troubleshooting typical issues when connecting a USB flash drive to your phone:
1. My Flash Drive Isn’t Recognized or Doesn’t Show Up:
- Check Physical Connections: Ensure the adapter is firmly seated in your phone’s charging port and the USB flash drive is fully inserted into the adapter (or directly into your phone’s port if it’s a direct USB-C drive). Sometimes a slight wiggle or re-insertion can fix it.
- Verify File System Format: This is a common culprit. As discussed, your phone needs the drive to be formatted in a compatible file system like exFAT, FAT32 (with its 4GB file size limit), or APFS/HFS+ (for iPhones). If your drive is formatted as NTFS (common for Windows computers), your phone likely won’t recognize it. You’ll need to reformat the drive on a computer.
- Power Requirements (Especially for External Hard Drives): Larger external hard drives (not typically flash drives, but relevant if you’re trying to connect one) might draw more power than your phone can supply. If you’re using such a device, a powered USB hub (which has its own power source) might be necessary.
- Restart Your Phone: The classic tech fix! Sometimes, a quick restart of your iPhone or Android phone can resolve minor software glitches preventing the drive from being detected.
- Check USB OTG Support (Android only): While most modern Android phones support USB On-The-Go (OTG), some very old or budget models might not. Consult your phone’s specifications or look for an “OTG” setting in your phone’s settings.
2. I Can’t Copy or Move Files to the Flash Drive:
- File Size Limit (FAT32): If your flash drive is formatted as FAT32, you cannot transfer any single file larger than 4GB. This is a hard limit of the FAT32 file system. For larger files (like high-quality videos), you must format the drive to exFAT.
- Drive is Full: It sounds obvious, but ensure there’s enough free space on the flash drive for the files you’re trying to copy.
- Write Protection: Some flash drives have a small physical switch that enables write protection, preventing any data from being written or deleted. Check your drive for such a switch and ensure it’s in the “unlocked” or “write enabled” position.
- App Permissions (Android): Ensure the file manager app you are using on your Android phone has the necessary permissions to access and write to external storage.
3. File Transfers Are Very Slow:
- USB Version Mismatch: If your flash drive is USB 3.0/3.1/3.2 but your adapter (or phone’s port, especially older models) is only USB 2.0, the transfer speed will be limited to the slower USB 2.0 standard. Always try to match the USB version for optimal speeds.
- Many Small Files vs. Few Large Files: Transferring thousands of small files takes significantly longer than transferring one large file of the same total size. This is due to the overhead involved in processing each individual file.
- Adapter/Cable Quality: A low-quality or damaged adapter/cable can bottleneck transfer speeds. If you suspect this, try a different, reputable brand adapter.
4. My Flash Drive (or Adapter) Gets Hot:
- Normal During Heavy Use: It’s normal for flash drives and adapters to get warm, especially during prolonged or heavy data transfer (e.g., copying large video files). This is due to the electrical activity.
- Excessive Heat: If the drive or adapter becomes excessively hot to the touch, disconnect it. This could indicate an issue with the device or the power draw. Allow it to cool before trying again.
By understanding these common issues and their solutions, you’ll be well-equipped to use your USB flash drive with your phone effectively.
Conclusion
Connect USB flash drive to phone – iPhone or Android, offers a convenient way to manage files, expand storage, and share data without relying on internet connectivity, which can be unreliable in some areas. With the right adapter (if needed) and a compatible USB drive, you can easily access and transfer your important files, ensuring you have backups of your travel memories and access to essential documents wherever your adventures take you. Remember to safely eject your drive before disconnecting to prevent data loss.
Additional helpful information:
You may also directly add an internal SD memory card, click here for more information: How to Add More Storage to Android Phone or Tablet?
There are many devices you can connect to your phone via the USB-C connector – Phone Charging Port: USB-C Phone Connectivity Guide


")


")


